Sunday, 24 March 2013

Evaluation Report


This module has developed my digital media skills and understanding of photograph’s language. For example how it communicates effectively as a visual medium and how its imagery operates so that I can finds ways of using these areas of knowledge to respond creatively to client-led or commissioned work.

The module was split up into two different sections. The first part was to design and create a Time Capsule that represented 21st Century culture which could contain either Archival Print or purely digital. The second section was to create the imagery that the capsule will secure in the form of the following five briefs, Pop culture, An Event of Significance, Contemporary Exterior Architecture, Contemporary Interior Space and Contemporary Cuisine. I knew this was going to be a challenge for me but was willing to put 100% effort in to achieve the best result I could get.

During another module that was running at the same time I built a room set within a group. This was a very challenging task and something we had been working on for weeks. Once we had finished the module it felt very rewarding and worthwhile. I came up with the idea of taking a picture every couple of minutes when the room set was in the process of been taken down. I used the images in my Time Lapse for the event of significance brief. In total I captured around 100 frames which is just the right amount for a 20 second movie. I create the clip using Windows Movie Maker Live. It was quick and simple to upload the images and add the music onto the background. As the movie couldn't be uploaded straight onto my blog I had to upload it onto YouTube then put the link on my blog.

Another brief for the Time Capsule was Cuisine. I had already photographed food in the past which I thought was fun and something a bit different to what I was used to. I was keen to do another Cuisine shoot to try and improve skills in this specific genre of photography. This originally was supposed to be group work but unfortunately I was unable to attend on the day of shooting. We had to arrange the shoot with the catering student as they were going to prepare the food for us. As I missed this opportunity I had to organize something by myself. As I work at a restaurant this wasn't going to be too difficult for me. I went early to a shift one morning to photograph some of the deserts that had been prepared for service. I photographed a Raspberry cheesecake with coulis on the side.    The only problem I had with this is I didn't have much time to capture the image. I felt a bit rushed and would have definitely received a better outcome if it was in a controlled environment or in the studio. Although I am happy with how this shoot went as the cheesecake looks really appetizing. It has made me more comfortable when working with food and is definitely something I would like to try again.

Pop culture was something I struggled to get started on as I took me some time to decide what I wanted to shoot. I researched into what Pop Culture is other people’s point of views which gave me a good understanding of the topic. I summed up Pop Culture is more or less anything popular in today’s world. This could be Music, Food, Television programs, band etc. I was mostly drawn to the music side which then gave me the idea of photographing a Guitarist in their natural environment. I didn't want the image to look set up or control I wanted it to have a natural feel to it. The angle I took the picture from made it look really effective as if I caught him during his act. I experimented with different backgrounds as I wanted to find one that complimented the main subject. I also made this image into a moving image firstly by creating a GIFF file on Photoshop and then a small clip using Windows Movie Maker. The models head moves from left to right although it’s a tad jerky.

The most enjoyable shoot I did for this module was for the Contemporary Exterior Architecture brief. This shoot took place in Leeds City center as there are many extraordinary building that were perfect for this particular brief. It was a glorious day, not a cloud in the sky which helped the building stand out and contrast from the vibrant blue background (the sky). I decided to photograph two different buildings, the Candle House and Water Bridge Place. The most effect building was Water Bridge Place which is been said to be the tallest building in Britain. I photographed the building from as many angles as I could find which are shown on the contact sheets. I had a few distractions on the day of the shoot but I tried not to let them ruined the photograph. As Leeds is a busy city there were a lot of people walking by and didn't hesitate to walk in front of the camera. This delayed the shoot and made it take a lot longer than it should have done. I think the most effective images on the contact sheets were the ones where I was stood pretty close to the building looking up showing the full height. This made the images look almost abstract which is why I choose to use these as one of my final pieces.

I have decided to put all my final images onto a CD which will then be put into my Time Capsule. I wanted to keep it simple and small so it would be easy to create. The material I used for the Time Capsule is Timber and Plywood. They were easy to cut but still thick enough so nothing can get into the box when buried. The box was created in my garage where I had all the correct cutting equipment and safety gear. Overall I am happy with how the box has turned out. The box is big enough for a CD case to fit in. The two strips of wood on the lid are to keep the lid in place and to stop it slipping off. I also sanded it down so the edges were smooth but it isn't perfect.

Interior space is the brief that has let me down the most. As a group we visited Dean Clough in Halifax and photographed the interior space. The challenge was to put the images together to create a 360 virtual tour. I managed to string the images together using PTGUI although unfortunately I didn't have to correct program to convert the stitched image into a virtual tour which is Pano2VR. I tried a number of times to get the program up and running but my laptop crashed every time it loaded.

This course requires working with a lot of deadlines; therefore it can be difficult to keep up with deadlines, especially when the work load gets high. I think the most important thing to ease stress, complete work on time and manage time is to keep your work well organized. In the past I have tried many tools for doing this but I have only just found one that works best for me. I now keep a dairy with me at all times which has been really useful. Whenever I become aware of an important date I will write it down straight away. I have also set reminders on Microsoft Office which also help me remember important dates and times. You can set several notifications so that you can complete sections of the work in a manageable period before the deadline. Although I feel like I could have possibly managed my time a little better as it took me quite some time to start the project and decided what I would like to do for each particular brief.

Overall I think this module has been successful although there have been some bumps along the road. I am happy with my final images but I think they could be improved if I had more time. In the future I believe I need to work more in the studio to develop my skills. I haven’t really had a chance to experiment with different lighting or backgrounds. This is something that will make me more confident in photograph and help me understand how the lights affect the image in certain ways. Also in future shoots I would like to include models as it isn't something I have been uncomfortable with doing in the past. 

FINAL IMAGES

Exterior Architecture
Pop Culture 
Cuisine


http://www.youtube.com/watch?v=CT0iaruA8qs

Event of significance


Pop Culture


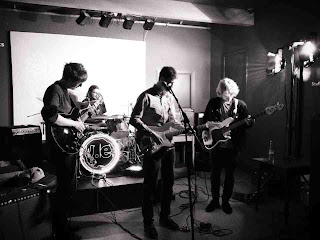
This is another picture i took for the Pop Culture Brief. I am now undecided on which image to use as my final piece. This image was taken in a local bar.

Thursday, 21 March 2013

PTGUI

This is the photographed I stitched together using PTGUI. I am happy with how this has been put together. The room now looks a lot better than it actually is. 


YouTube videos

http://www.youtube.com/watch?v=CkH05tYIhyE

http://www.youtube.com/watch?v=ofOn2PfW4ws

http://www.youtube.com/watch?v=Q_GvblGsqo4

These movies clips have helped me understand how 360 photography works. I am now keen to start one myself.

Panoramas


Three flavors of panoramas

In terms of the format of panoramas, there are essentially three different kinds: 
  • Partial panoramas that you know mainly from traditional landscape photography. They are created by stitching (assembling) of multiple normal photos together side-by-side, which creates a photo with much wider angle that would be possible with a normal lens.
    360Cities does not support partial panoramas.
  • Cylindrical 360ยบ panoramas - One notch higher are 360° photos which capture the whole field of view in all directions around the photographer. These are sometimes called cylindrical panoramas. They cover 360-degrees around but not up and down view. These are too created by stitching multiple photos together. The only real difference from partial panoramas is that you need to make sure the first and the last photos overlap. There are also so called "one shot" 360-degree lenses but they are by definition very low quality compared to the traditional stitched panoramas.
  • Spherical panoramas are the top of the line which not only capture the 360-degree field of view but in which you can also look up and down. They can even be taken in a way that you can't see the tripod nor the photographer's shadow in the picture. 

The secret of creating 360 panoramas

So, what is the secret of creating a 360 panorama? It's actually pretty easy. You, the photographer, choose a place from which you want the panorama to be taken. Then you start taking photos around yourself until you cover the whole intended field of view with photos. It does not really matter what camera or lens you use, you can even use a cell phone, as long as the photos overlap. The easiest, though, is to use a digital SLR camera with a fisheye lens. The wider the viewing angle of the lens is, the less photos you need to cover the entire field of view. With a cell phone, you will need many photos, with a fisheye lens, you need as little as three to cover the entire sphere. 

http://www.youtube.com/watch?feature=player_embedded&v=ouOEM4cKKGc

This video shows how to take fully spherical 360 panoramas without the visible tripod. 


http://help.360cities.net/taking-panoramic-pictures/how-to-get-started

360 photography


REGASYS Logo - House

360 Virtual Tours, Photos and Videos


http://www.regasys.com/services/360-photography/?ad=GAT_360-degree-virtual-tours_03

This websites demonstrates 360 Photography.

Making of the box

Firstly I measured for the wood to the correct size I needed for the time capsule. I cut the 25m x 50m Timber with a saw my dad had in the garage. The saw gave it a nice clean cut although i will still have to sand in down afterwards. 


Once I cut all the piece to size I inserted a random CD in the space so I knew for sure it was going to fit. 


This is the 12mm Plywood I used for the box. I choose to use this particular wood because it is very thick therefore will last longer when underground. I will need to measure up the size and cut again using the saw. 


I then nailed the four pieces of timber together with and nail gun. As this gun is very powerful I had someone holding the wood together so it would move. 


Below is the finished box. I nailed the Plywood onto one side and left the other side so it can be taken off. 


The lid has two strips of timber nailed on which fit perfectly and makes the CD in place. This makes the lid stay with the box although it can be taken off. If i was to bury this time capsule I would nailed the lid shut so nothing can get inside and destroy the CD.   


Time Capsule Planning

The measurements of my box


Time Capsule Planning

How long does wood last underground?

Under optimal conditions, 15-20 years. In the direct sunlight, with no added treatments on your part, as little as 3-5 years. 20 years lucky ....15 maximum for treated wood, now when you retreat it over and over you keep weakening it further and further because all wood preservatives soften the fibers and naturally the result is crumbly wood but all wood preserved not exposed to the environment could outlive you, in otherwards the fence posts you put into the ground will rot above ground and 50 years later the part under the ground will likely still be as fresh and new as when you put them into the ground ...even a treated wood foundation for a playhouse or shed will still be like new .

http://wiki.answers.com/Q/How_long_does_treated_wood_last


I was worried about using wood as it has a high chance of rotting underground. Although while researching different pages online I have learnt most woods last up to 10 years with no direct sunlight. Many coffins are made out of wood and last many years. 

Wednesday, 20 March 2013

Time Capsule

I have decided to build my time capsule out of wood. The box will be big enough to fit one CD and a CD case inside it with all my work on. I wanted to keep it simple. The box will be sealed so it cannot be opened be anything or anyone.


This is a sketch of the shape and different types of wood used for the box. I will be using a nail gun to hold each piece of wood together. 

Time Capsule Research

I have always enjoyed the concept of a time capsule and even made one when I was a child out of a shoe box and buried it in the back garden.  This module has made my interest grow therefore I want to research into bigger and more famous time capsules.


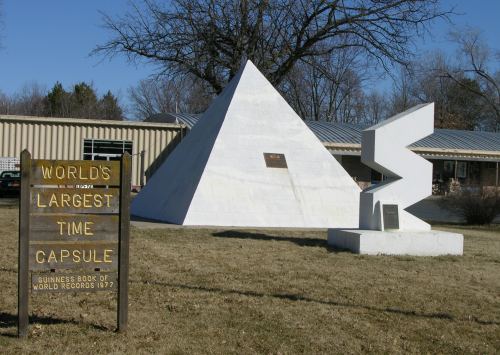
This time capsule is buried in Seward created by Harold Keith Davisson. It is known to be the largest in the world. Harold created the time capsule for his grandchildren because it wanted to show them what his life was like in 1975. The 45 ton vault was sealed on the front lawn to his appliances store and held over 5,000 item, including a pair of bikini pants, a man’s leisure suit and a Chevy Vega (car). The time capsule will be open on July 4, 2025. 

Img 0038.Jpg

Time Capsule Expo 1970. The lower capsule will remain buried for 5,000 years. The upper capsule (A control capsule) was opened in 2000 to examine the condition of its contents. After undergoing laboratory testing it was reburied and will be opened every 100 years thereafter so that the latest preservation techniques can be used to ensure their safekeeping.

6A00D834543B6069E200E54F15Eb098833-800Wi.Jpg


In 1957 a large concrete vault was sealed at the Tulsa County Courthouse to be opened in 2007 to celebrate Oklahoma’s Centennial as a state.
Pop culture is entertainment, music and sports.

Popular culture is distributed across many forms of mass communication including newspapers, magazines, radio, television, movies, music, books and cheap novels, comics and cartoons, and advertising. It contrasts with high cultural art forms, such as opera, classical music and artworks, traditional theater and literature.
In mass communication, the term popular culture refers to messages that make limited intellectual and aesthetic demands through content that is designed to amuse and entertain audiences.
aesthetic refers to the appreciation of beauty and good taste.

Where did it come from?

After the Industrial Revolution, people had increased leisure time. This led to demand for amusement and entertainment, which prompted growth of mass media. Also after the Industrial Revolution, the increased supply of goods necessitated advertising to attract consumers. Mass media wanted to reach the largest audience possible. That influenced the content of mass media.

Why do we care?
We're concerned with popular culture because:
It reaches almost all the public
It influences how we think, dress and act
It has an economic impact on media
It influences content of media

What did we have before pop culture?
Prior to mass media there were two kinds of art:
Folk art – unsophisticated, localized, natural works by unknown artists.
Elite art – more complex works deliberately produced so artists gained recognition.
In ancient times prior to writing, oral performance was accessible to the whole community. 

http://www.uncp.edu/home/acurtis/Courses/ResourcesForCourses/Music&PopCulture.html


What is Pop Culture?

From Wikipedia, the free encyclopedia

Popular culture is the entirety of ideas, perspectives, attitudes, memes, images, and other phenomena that are within the mainstream of a given culture, especially Western culture of the early to mid 20th century and the emerging global mainstream of the late 20th and early 21st century. Heavily influenced by mass media, this collection of ideas permeates the everyday lives of the society.

History and definition

The term "popular culture" was coined in the 19th century or earlier. Traditionally, the term has denoted the education and general "culturedness" of the lower classes. as opposed to the "official culture" and higher or the education emanated by the dominant classes

Pop Culture Image

I created a moving image using windows movie maker live. Here is the link to my video on YouTube. http://www.youtube.com/watch?v=XYYnhCcDVPU&feature=youtu.be

I then created the same animation image on Photoshop. I used the puppet warp tool to move the head on the model. Once I had the two different frames I put the layers into the animation tool bar. I then went to save to web and devices and saved it as a GIFF file. 


Here is the link to my Popular Culture image which I created into a moving image.

file:///C:/Users/PC/Documents/Batley%20school%20of%20Art%20and%20Design/John%20Todd/GIFF-liam-.html


Below is the Edited image without the animation.


I prefer this background because its more scenic and contrasts nicely with the main subject. I like the fact the background is out of focus as it gives the model more attention. 

Tuesday, 19 March 2013

How I Created My Time Lapse...


I created my time lapse using windows movie maker live. This allowed me to add as many pictures as I wish, i added 104 Jpeg images. The pictures were already in the correct order I needed them to be in for the time lapse so i was ready to get started straight away. Each frame was set to 7.00 seconds each but i changed the speed to 0.1 so the movie was quicker. I then added in an introduction page and a closing page which will hopefully help the viewer’s get into the movie. I decided to have music playing in the background to engage the viewers. I choose Eine kleine Nachtmusik by Mozart as I thought it would be suitable then fits in well time wise. The music speeds up when the first few frames come onto the screen. I also faded the music out slowly when the closing pages came on.

I choose to do a time lapse of the room set we produced during Stewarts module. I captured the images when the room was been taken down therefore everything is in reverse order. I consider this to be an event of significant as it is representing someone moving house and making a change.

I thought it would be easier to upload the video onto you tube. The link is displayed below.

Link To My Time Lapse

http://www.youtube.com/watch?v=CT0iaruA8qs&feature=youtu.be


Friday, 15 March 2013

What is time lapse?


What is Time Lapse Photography?


In a nutshell, time lapse photography is the practice of shooting each frame of your film with a specified amount of time in between each frame. Most films are shot and played back at 24-30 frames per second.  At 24 frames per second, the human eye cannot detect where one frame ends and the other begins thus creating a smooth, life-like moving picture when shown in sequence. Time lapse photography is the practice by which more time is allowed to pass in between each frame than normal, thereby creating the illusion that time goes faster when the film is played back at 24 frames per second. In time lapse photography, normally slow moving phenomena such as flowers blooming, clouds passing in the sky, sunsets, etc. can be made to look as though they are moving faster. 


Tips for creating time lapse video


Tips on How to Create a Good Time Lapse Video

  • Use a tripod or, at the very least, a steady surface where your camera will not move or wobble.
  • Shoot moving objects. For example, the night sky, crowds, sunsets, sunrises, etc.
  • If you’re shooting in a time of the day when the light is fairly constant (i.e. midday or at night), use manual exposure settings. Set the shutter speed and the aperture and the ISO to what you think is the best exposure setting for the look you want to have in your video. This will give you a constant exposure for all the frames in your video, that is, if the light stays constant
  • If you’re shooting in a time of day when the light is constantly changing (i.e. sunsets or sunrises), use your camera’s Auto exposure functions such as aperture priority or shutter priority. The downside of using your camera’s auto exposure functions is that sometimes your camera will underexpose or overexpose a few frames in your video sequence causing your finished time lapse video to look like it is flickering. This is a common occurrence when doing time lapse video and can be somewhat corrected using certain video editors.
http://designinstruct.com/photography/creating-a-time-lapse-video-in-photoshop/

Wednesday, 6 March 2013

YouTube video

These time lapses are shot with 12 mega pixel Nikon digital single lens reflex cameras. Original resolution is 6 times better than HD (high definition). The images have been resized for HD and are much better quality than shown here on YouTube. 
http://www.youtube.com/watch?v=_xMz2SnSWS4


This is a time lapse I found on YouTube. I thought it looked amazing and really sold the place to me. He has captures some beautiful shot at night with the lights and cars passing. The music fits in perfectly as its smoothing and mellow.

Time lapse- Statement of intent

I have to experiment with a variety of digital media including time lapse. This is a opportunity to produce a time lapse on an event of significant. My first idea was to spend on day on Blackpool beach and photograph the tide coming in and going back out. My mind soon changed as it isn't really an event its a natural thing that happens everyday. I struggled to come up with an idea for quite some time after this.

For another module we have been recreating a room set to photograph in groups. When taking the set down I thought it could make a good time lapse showing the stages that were make to set it up. This is significant to me as its something I am proud of and worked hard on. I will try to take around 100 photographs showing what was used in the set and take a picture each time something is taken away.

I wont be needing to edit the images as I will be leaving the edge of the set in the frame so its obvious what is it. I will be opening the images in animation on Photoshop to create a Giff file. I will then experiment with the number of seconds between each images. 0.1 seconds is normally the most effective.

Events through the 20th century

The Ten Most World-Changing Events of the 20th Century


These will mostly be moments or events which span only a day or so. Therefore, advancements and inventions are not included, neither are the influence or works of particular people unless that influence came from a major event.

10. Attack on Pearl Harbor
December 7, 1941, Pearl Harbor, Hawaii, USA

9. The October Revolution
November 7, 1917, Petrograd Russia

8. D-Day
June 6, 1944, Normandy, France

7. Discovery of Penicillin
September 28, 1928, London England

6. Fall of the Berlin Wall
November 9, 1989, Berlin, Germany

5. Assassination of Franz Ferdinand
June 28, 1914, Sarajevo, Austria-Hungary

4. Stock Market Crash of 1929
October 29, 1929, New York City, USA

3. Creation of Israel as a Jewish State
November 29, 1947, UN General Assembly

2. The Moon Landing
July 21, 1969, Sea of Tranquility, The Moon

1. The Bombing of Hiroshima
August 6, 1945, Hiroshima, Japan

http://ianthecool.wordpress.com/2010/12/03/the-ten-most-world-changing-events-of-the-20th-century/


While researching into what others think most people believe they are major events that have happened in the past, some are still heard about today which I agree on. Although I stick with what I said that even something so small can be significance to someone. 

What is an event of significant?


History is not just a list of events and people, not everything that happened is recorded, instead it should be seen as a list of events and people that matter enough to be noticed. We need to think about who decides who or what is important? We need to think about what criteria we use to judge what is important and why? We need to think about how our judgement and that of other people, is affected by our and their own values, beliefs and preconceptions.

Why is 1066 a significant date in English history? It is supposed to be a date imprinted on the minds of every school child in the country but why can something that happened nearly a thousand years ago be considered to be significant by people today?

The work of Rob Phillips and Christine Counsell suggest criteria you can use to test whether an event or a person is significant or not. Think ''RRRRR'.

R
The event or person was REMARKABLE, they were remarked on at the time and by people since. They were considered to be important by their contemporaries and by following generations
R
The person or event has been REMEMBERED by groups who consider it to be an important part of the nations past.
R
The event or person RESULTED IN CHANGE, their were important consequences for the future.
R
RESONANT, people can link their experiences, beliefs or situations to this person or event.
R
REVEALING, it tells us something about the lives of ordinary people normally hidden from our view.
http://www.historyatfreeston.co.uk/FBECHistorySite/Questions/Significance.htm

My thoughts

I believe people have different opinions to what is significant. It’s what matters to them and what they believe is important, even if it’s something small like a football match. For example England winning the world cup in 1966 might have been an event of significant to some but not to others.

Behind the scenes at a McDonald's photoshoot

http://www.youtube.com/watch?v=oSd0keSj2W8

This is a link to a three minute clip on youtube which explains why McDonald's food looks different in the advertising to what it does in the store. When recreating a burger in the studio they are using the same product and the same amount as what you buy in the shop. All they are doing is bringing the ingredients forward so we can see what we are paying for.

The burger is then send through to editing where they retouch any parts needed, for example when the seeds  fall off the bun.

Tuesday, 5 March 2013

Raspberry Cheesecake Edit Step by Step

This is the original image of the Raspberry cheesecake. As the desert was to take out to the customers I had to be extremely fast when taking the picture. This didn't give me much time to set up the image or think about any possible compositions I would like to use which let me down. 

Original image 


Edit one 
I cropped the image which took lots of the distraction away from the background. The composition is now a lot neater and draws more attention to the actual subject itself. I am going to edit out the paper in the background which is again a distract to the viewers. 


Edit two 
I then altered the curve level slightly to emphasize some of the highlights and shadows in the image. The colours now seen to be brighter also. 


Edit three 
Then I refined edged the right hand side of the background showing at the top of the photography. I copied this section and paste it onto the other side to cover up the pieces of paper which was drawing the attention away from the main subject. 

Cuisine Image- Raspberry Cheesecake


This is the image I shot during my visit at the Golcar Lily Restaurant. I decided to do a desert as this is my favorite course and personally think it looks the most appetizing. I really like the new composition after it has been edited. The coulis sauce leads our eyes up to the main subject, being the cheesecake. 

In the next post I will show you the different stages of editing that was made. 

Saturday, 2 March 2013

Food Photography Shoot

Group Work

Beforehand the group got together to discuss what food we will be photographing and whether we need any particular props. To make life easier for us we limited our options to cold dishes only, or at least a warm dish that we could get away with serving cold.

After many different idea had been thrown in we decided on a small pasta dish that would be complimented with a side salad. Then we thought why only do one course when we can do three? Unfortunately I was unable to make it in on the day of the shoot so I going to arrange my own food photography shoot.

Arranging my own shoot

I contacted the catering student who was originally supposed to prepare the food for the group via text and email although I got no response. Luckily for me I work in a restaurant so I wasn't going to be too difficult to arrange something on my own.

The shoot

I had permission to turn up early to a shift on morning so I was able to photograph some of the food ready for service. I was using natural lighting which worked more effectively than I thought it would. I didn't have a tripod on the day of the shoot although I don't think I would have used it as I was focusing on the photographs close up. I have to make sure I was as sturdy as possible as I was shooting hand held.

The only negative I can really think about is I felt a bit rushed on the shoot. Obviously the food had to be sent out very quickly to the customers so I didn’t have a lot of time to think about composition etc. looking back now it would have been easier for me to do it in the studio in a controlled environment.

Food Photography – An Introduction by Darren Rowse


1. Lighting

Treat the food you’re photographing as you would any other still life subject and ensure that it is well lit. One of the best places to photograph food is by a window where there is plenty of natural light – perhaps supported with flash bounced off a ceiling or wall to give more balanced lighting that cuts out the shadows. This daylight helps to keep the food looking much more natural.

2. Props
Pay attention not only to the arrangement of the food itself but to the context that you put it in including the plate or bowl and any table settings around it. Don’t clutter the photo with a full table setting but consider one or two extra elements such as a glass, fork, flower or napkin. These elements can often be placed in secondary positions in the foreground or background of your shot.

3. Be Quick
Food doesn’t keep it’s appetizing looks for long so as a photographer you’ll need to be well prepared and able to shoot quickly after it’s been cooked before it melts, collapses, wilts and/or changes color. This means being prepared and knowing what you want to achieve before the food arrives.

4. Style it
The way food is set out on the plate is as important as the way you photograph it. Pay attention to the balance of food in a shot (color, shapes etc) and leave a way into the shot (using leading lines and the rule of thirds to help guide your viewer’s eye into the dish). One of the best ways to learn is to get some cook books to see how the pros do it.

5. Enhance it
One tip that a photographer gave me last week when I said I was writing this was to have some vegetable oil on hand and to brush it over food to make it glisten in your shots.

6. Get Down Low
A mistake that many beginner food photographers make is taking shots that look down on a plate from directly above. While this can work in some circumstances – in most cases you’ll get a more better shot by shooting from down close to plate level (or slightly above it).

7. Macro
Really focusing in upon just one part of the dish can be an effective way of highlighting the different elements of it.

8. Steam
Having steam rising off your food can give it a ‘just cooked’ feel which some food photographers like. Of course this can be difficult to achieve naturally. I spoke with one food stylist a few years back who told me that they added steam with a number of artificial strategies including microwaving water soaked cotton balls and placing them behind food.


These tips will help when shooting my food photographs.

Cuisine Artist Research- Bruce Head

Image found on the AOP 


This image caught my attention because of its vibrant amazing colours. They contrast well together although it looks to have been edited on Photoshop to emphasize these colours even more. Instead of shooting straight on the photographer has captured the cheesecake sideways so you can see more of the texture and height in the desert. 

I like the way Bruce has composed this image. He has thought about where he wants everything and hasn’t just thrown it all on.  The objects in the background are out of focus which is creating depth of field. On the other hand the main subject in the foreground is sharp and clear which draws the viewer’s attention to this point. The light hits the plate nicely giving the food a glow helping it draw in attention.

He has placed the sliced strawberry facing toward to camera so the viewers are able the see the juiciness of the fruit. This shoot has been done on a plain white background to draw more attention to the subject without any distraction in the photograph.


Cusine Artist Research- Gerrit Buntrock


Gerrit Buntrock is a food and drink specialist working with design, editorial and advertising clients. He has two fully equipped studios for digital capture.


Images found on the AOP


The background is out of focus which draws more attention to the subject. The whisk is holding the chocolate nicely making it more appetizing. The whisk is also bang in the center and nearly symmetrical.  


Again the colours are very vibrant and the red contrast hugely with the green apples. There are water droplets on some of the apples which show the smooth textures. The light is shining nicely onto the top of the apple making them look fresh and edible. If I was to recreate this image I would make the apples cover the whole frame without having a background. 


The composition is really nice in this image. The rule of thirds is used by having the subject to one side and having a small amount of negative space on the left hand side. The fruit is vibrant and stands out drastically from the background. The crust is very sharp so the viewers can see plenty texture and pattern in the photograph. 


The bread bun is nicely presented looking fresh and edible. Part of the background at the top is out of focus which is showing depth of field. He has kept the background plain to draw more attention to the bread bun. 


Cuisine Photography


List of things I need to consider during the shoot
  1. When photographing I need to get fresh ingredients and try not to over manipulate the food and keep it simple.
  2. Be adventurous with the food. Do something I haven’t seen done before.
  3. Understand what caught my attention and what made me decide to shoot this certain kind of food.
  4. Whether it been the shape or the texture. I will then get an idea of what kind of lighting I am going to get and will know which angle is going to be best to photograph the subject from.
  5. Keep observing my subject.
  6. Keep an eye out for contrast.
  7.  Select props and backgrounds that will complement the food without being overwhelming.
  8. Explore and experiment- the best shot might not be the one I planned.
  9. Use a tripod if I can get hold of one. This will reduce chance of camera shake and will allow me to take longer exposures.
  10. Think about white balance before and during the shoot.
  11. Think about which type of lens is going to be the most suitable- maybe a small lens would be the most effective.
  12. Draw the viewer’s attention straight to the subject.
  13.  Take lots of reference shots. i.e. take shots of the lighting set up, shots of the background and props.
  14. Take notice of my mistakes so I don’t repeat them and know what to do next time to correct myself.
  15. Let others inspire me and seek other people’s feedback.
  16. Don’t rely on Photoshop too much to correct the mistakes- try to get it correct while shooting otherwise it can look over edited.
  17. Think about the composition- don’t just through the subject in anywhere think about techniques, such as Rule of Thirds, Leading lines, Symmetry and Depth of field.


Pop culture


Here is the image I have taken for the Pop Culture brief. I am really happy with this result because it looks relaxed and casual. I choose to take the image from this particular angle so it didn't look set up. The background is slightly blurred allowing the main subject to gain more attention.

While editing this photograph I will maybe change to background to something more scenic. The original background is in the models own home but something a little more interesting will grab the viewers attention. To get a different background onto this image I will refine edge the subject then drag and drop onto a new background.

Pop culture photography


I like this images above because it doesn't look set up. The photographer has taken the image while she is in action which make it look more believable.   

I want to focus on music for the Pop Culture brief. I plan to photograph my friend who has played guitar for as long as I can remember. He is really passionate about the instrument and hardly ever goes anywhere without it. This is getting more and more common in young people and this is how it fits in with popular culture. I want the photo to be taken when he is in his own room, this way it will look more realistic rather than shooting in the studio. I don't want the image to look controlled I want it to have a natural relaxed feel to it therefore I will be using daylight to light the photograph. I will be using a Nikon 3D00 to shoot this image.


Thoughts after the shoot


 Overall I am happy with the outcome of my architecture images. I arrived in Leeds at around 11.00am on the Wednesday morning. Because i went during the week there were very few people about apart from the occasional dog walker and runner. 

The weather was beautiful, not a cloud in the sky which to my advantage is exactly what I was hoping for. The buildings stood out hugely with the clear blue sky in the background.

I tried to get nice symmetrical compositions with lots of lines and pattern within the image. I also did a few close ups where I focused on the bright colours and textures on the subject. The Candle House was very impressive to look at as it was something I hadn't really seen before.

I started shooting looking up at the building quiet close up to see more detail and textures. Originally I was going to bring a tripod to sturdy my camera but didn't manage to hire one out. Therefore all my images are hand held.

My favorite Images are the ones showing the full length of the buildings. I got some great outcomes of the lines shooting from different angles and heights.


Friday, 1 March 2013

Architecture Edit two


The second image i choose to edit is other photograph of the Bridgewater place. I took this image by stranding before pointing my camera upwards. The angle I am at is showing the viewer’s how tall the building actually is although it looks a lot taller in person.

I really like the composition of this photography and with a few adjustments i am hoping it will make a really nice, eye catching image.

I have decided after altering the curve level on Photoshop it doesn't need adjusting anymore. The highlights and shadows in the image have now been emphasized. The leading lines are what draw our eyes to the negative space in the sky. Most of the lines meet at a point drawing our eyes to one area. 


Architecture Edit one

After pestering my family and friends for their opinions I agree that the final shoot (Bridgewater place)  is the most effective out of the three. I am hoping after a few alterations and editing I will receive an interesting, eye catching piece of architecture photography. I will be adjusting the curve level to emphasize some of the highlights and shadows within the frame.

Original 
Edited image 


Edit one 

I firstly cropped the images so it was straight on the right hand side. It almost looks like a ladder which makes it harder to figure out what it is. The blue sky goes really well with the building. 

Leeds Shoot- Bridgewater Place


Last but not least I photographed this large modern building from many different angles, including;

·         Looking straight up at the building.
·          From a distance
·          Capturing little bits of the subject to create interesting compositions such as rule of thirds and negative space.
·         360, walking all the way around to capture different images and shapes.

I think this is the most effective shoot and the one I mostly enjoyed. This is probably because I hadn't done anything like this before so it was good to experiment with something new. Bridgewater place is the tallest building in Yorkshire, and has held this record since being topped out in September 2005. It is visible at up to 25 miles (40 km) from certain areas.

The images I think are the most effective from this contact sheet are the close up ones. I have created almost an abstract effect as you can’t really figure out what the subject is at first glance. The clear blue sky makes it even more difficult to figure out which I think works really well. 


Contact Shoot Three 

Leeds Shoot- Granary Wharf


Just around the corner from the Candle House I spotted this extraordinary block of apartments with a unique look. I haven’t really seen anything like this before so I thought it would make a great photograph and work perfectly for what I am trying to capture. The zigzag edge to the building is what really draws in my attention. If I was to edit this image I might crop/zoom into this area to focus on the zigzags. 

Contact Sheet two 

Leeds Shoot- The Candle House


This is one of the first building that caught my eye on the day of the shoot as it was so hard to miss. The Candle House offers a range of contemporary apartments in Leeds housed within award- winning architecture. The unique circular design and red- bricked exterior make it stand out against the city skyline.

 I prefer the photographs where the building is upright which means i have probably taken it from a better angle. The red building on the right hand side is a big distraction and takes the attention away from the main subject. I think the water below the building is really effect and creates a lovely reflection underneath the apartments; therefore i think the images captured from the road side are nowhere near as affected.

The clear blue sky creates negative space around the outside of the building and compliments the colours in the subject nicely. When editing I defiantly need to think about the highlights and shadows and whether I can emphasis these elements to receive a more effective outcome. 

Contact Sheet one 

Thursday, 28 February 2013

Thoughts before the shoot


Tomorrow I am going to shoot my Architecture images in Leeds. During my research I found some incredible buildings but I have decided to visit the Bridgewater Place, nicknamed The Dalek which is an office and residential skyscraper development.

 I had never even heard of this building before I did my research for i have printed off directions to help prevent me getting lost (not that it will be hard to miss). People walking past the building won’t be a real issue for me as I aim to shoot the building by looking up at it. I have checked the weather forecast and to my advantage it is supposed to be clear with blue skies, fingers crossed, this will make the shoot a lot easier for me. I will be going around midday so that i have most of the day to perfect the shot.

There are also many other buildings I could photograph from old churches to modern building, although I would like to stick to the newly built building as this is something I haven’t yet done. I will be shooting on a Nikon D300 during the shoot.


Artist Research- Peter Defty


I saw some photos by Peter Defty in a magazine and thought they were great. Looking through his images ‘London’ I saw a repetition of having block black sections in the image.  The composition is really interesting because it makes it hard to tell what the image actually is at first glance.

Rule of thirds is used by having the sky, which could be seen as the key image is slightly off center. This image was taken from below looking on at the buildings and the sky. I think it creates a really interesting effect and makes it look more abstract. The clouds create detail in the photograph and help us recognize the sky. Personally I think the image would look plain without them. The building at the bottom of the image shows pattern and texture.

There is a lot of negative space in the image. Sometimes things you don’t capture are more important than the things you do. Peter is stood in-between are framing the sky nicely.  The zig-zag frame creates more detail in the image and makes it look a lot more interesting to if it was just a straight line- good location.


Image found on the AOP